When it comes to 3D printing, many people worry that a wide barrier stands between them and their ability to use this amazing technology.
That’s not surprising. When 3D printing gets talked about, it’s often in the context of huge undertakings, such as printing a heart valve for a child or a new skull for a puppy (both of these happened!). And yes, 3D printing can be used for amazing projects. But it can also be utilized to create and manufacture a great many other items, from premiums for small and medium businesses to practical everyday items for the hardcore hobbyist or do-it-yourselfer.
To demonstrate that the process of 3D printing is within everyone’s grasp, I’m going to how in just two hours we can move from concept to finished prototype. Let’s find something around the house that I could use. Like, say, a coaster?

Yeah, definitely a coaster needed here
Let’s start with the basic design. I used TinkerCAD a free online design program, to create the most simple coaster I could. It’s just one solid cylinder and one hollow cylinder stacked on top of each other, and sized into the proper dimension. It only took about five minutes to create this simple coaster.

Hmmmmm, something’s missing…
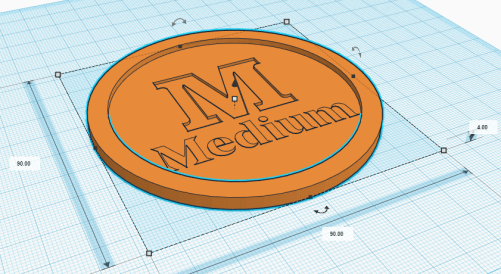
Much better!
So now we’ve created a 3D model, which anyone can do. The next step: converting this file to be 3D printed. You cannot just drop a 3D model into your printer. You have to employ an “in-between” program, known as a slicer. There are a lot of slicing programs that you can use, but the one used here is Slic3r, which is a free program.

Our coaster in Slic3r
So, what does a slicing program do? Well, the way most 3D printers work is to take whatever the file is and print it in layers. The printer lays down a single layer of material, moves up, lays down the next layer, moves up, and so on. The slicer program is what takes your 3D files and slices them into these layers for the printer to read.
Settings can be made specific to the material you are using, the type of printer, whether you are using support structure (more on that in a future column), what temperature to set for the material — everything that will control the printer. Each printer and material combination uses different settings, but almost all of these settings can be found online.

A close-up of the slice
Here we have a close-up of how the Slicer processes a file. The yellow is the path that the printer will follow while extruding PLA down. Anything red will just be filled in automatically by the printer as each layer of yellow is put down. We then export the file as the file type G-Code (essentially a coordinate path for the printer to follow) and save the code onto an SD Card.

Believe it or not, this is a coaster
Polylactic Acid, or PLA, is the most commonly used material for 3D Printing. It is a plastic substitute made from fermented plant starch, usually corn. It is environmentally friendly and surprisingly durable after being printed, and usually costs only $25/spool, making it an absolutely ideal material for printing.

A spool of PLA in its natural habitat.
The printer reads the code and heats up both the printer bed and the nozzle. The nozzle superheats the PLA, then deposits it onto the bed of the printer, where it quickly cools back to a solid. The printer lays down the first layer of the to-be-printed product, then moves up by .15mm and lays down the next layer. This process continues building the product layer by layer.

And slowly…
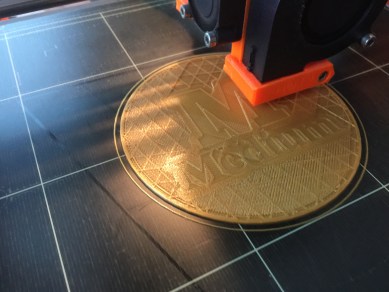
… our item…

… is created!
The printing process varies depending on the size and complexity of the project. In this case, it only took 1 hour 15 minutes to produce our coaster. 3D printers typically don’t need you to be right there during the printing process. If you’re running a simple print, just set the printer to do its thing and leave it alone.

The finished product!
And that’s it! In just two hours, we progressed from idea to finished prototype. Keep in mind, we were using a very simple design for a basic household object. But the same process can be used to print so many items we need: art projects, decorations, industrial components, even repair parts. In fact, experts often recommend that the first thing you print with a new 3D printer is its replacement parts.
Seems like a surprisingly simple process, doesn’t it? Rapid advances in technology has brought 3D printing out of the large-scale manufacturing plant and into the home. While not yet as user friendly as Star Trek’s replicator, the 3D printing skills you need to design and produce your own items are easy to attain and simple to master. Especially with support of the multitude of instructional resources available online and in basic and advanced classes.

Happy Printing!
Are you interested in learning more about 3D Printing, or do you have projects you want to work on and need someone to help with the design/printing? Contact The CAD Advantage today!